
Every app development ecosystem worth using needs its own do-everything CLI tool with a short, catchy name. Git has git, Node.js has npm, Rust has cargo, Vue has vue... And Holochain has hc. This article introduces you to this tool and the things you can do with it.
[Editor’s note: this guide is meant for Holochain 0.1. When a new version with breaking changes is released, we’ll update this guide shortly afterwards.]
Not just for scaffolding
In the previous article of this series, I introduced you to the hc scaffold command. That was a glimpse of what hc can do, but didn’t really explain what it was or how you might use it after you finished scaffolding.
It is of course, as you’ve just learned, Holochain’s version of that do-everything CLI tool that I claimed that every good project must have. You can use it to package/bundle, test, and run Holochain applications.
If you want to know what sorts of things it can do, you can always go hc help from inside the Holonix dev environment. But it wouldn’t make for a very interesting or helpful article if I ended there, so I’m going to dig into all the subcommands with you. (Note: I’m going to skip hc scaffold because I covered that in the previous article.)
In the scaffolding article we built an entire hApp from scratch. It wasn’t complicated — it only had one DNA, one coordinator zome, and one integrity zome, and a basic web-based client UI. (if I’m already getting confusing, don’t worry; I’ll define those terms below — or you can read the article). Let’s unpack each of those components in turn by exploring the tools you’ll use to work with them.
Note: In all of these examples I’ll be working on an app called gardenswap. So the first thing I’m going to do is create a project directory with the same name. I’m going to diverge a bit from the usual project structure of a scaffolded hApp, because at time of writing hc doesn’t let me create all the files in existing directories.
[holonix:~/Holochain]$ mkdir gardenswap
[holonix:~/Holochain]$ cd gardenswap
hc dna: working with DNAs
If you’ve read the Core Concepts, you’ll know that zomes (short for chromosomes) are the code modules that make up a DNA, and come in two flavours: integrity zomes, which define the ‘shape’ of valid data, and coordinator zomes, which contain business logic. Zomes are just WebAssembly files, which means you can theoretically write them in any language that compiles to WebAssembly — but right now we only provide Rust-based SDKs for writing integrity and coordinator zomes.
The contents of the DNA are specified in a DNA manifest file, a simple text file that hc dna will use to bundle everything up into a DNA file, ready to distribute.
hc dna init: creating a DNA manifest
But I’m getting ahead of myself here. When you’re creating a project from scratch (that is, not using hc scaffold), you’ll want to create an empty project directory and DNA manifest to put your zomes into. hc dna init will do that for you. If I enter the Holonix shell and type this command:
[holonix:~/Holochain/gardenswap]$ hc dna init dnas/gardenswap/workdirIt will ask you for a DNA name (I used gardenswap) and a network seed (I just went with what it suggested), then it will stub out a dna.yaml file for you. Here’s what’s inside that file:
manifest_version: '1'
name: gardenswap
integrity:
  network_seed: 00000000-0000-0000-0000-000000000000
  properties: null
  origin_time: 2023-03-10T17:42:14.028653Z
  zomes: []
coordinator:
  zomes: []
It’s not a complicated file, but if you’re new to Holochain, it’s probably not obvious what these fields are for. Let’s go into each one.
manifest_version: '1'This tells hc dna and the Holochain conductor what manifest format you’re using (currently there’s only version 1).
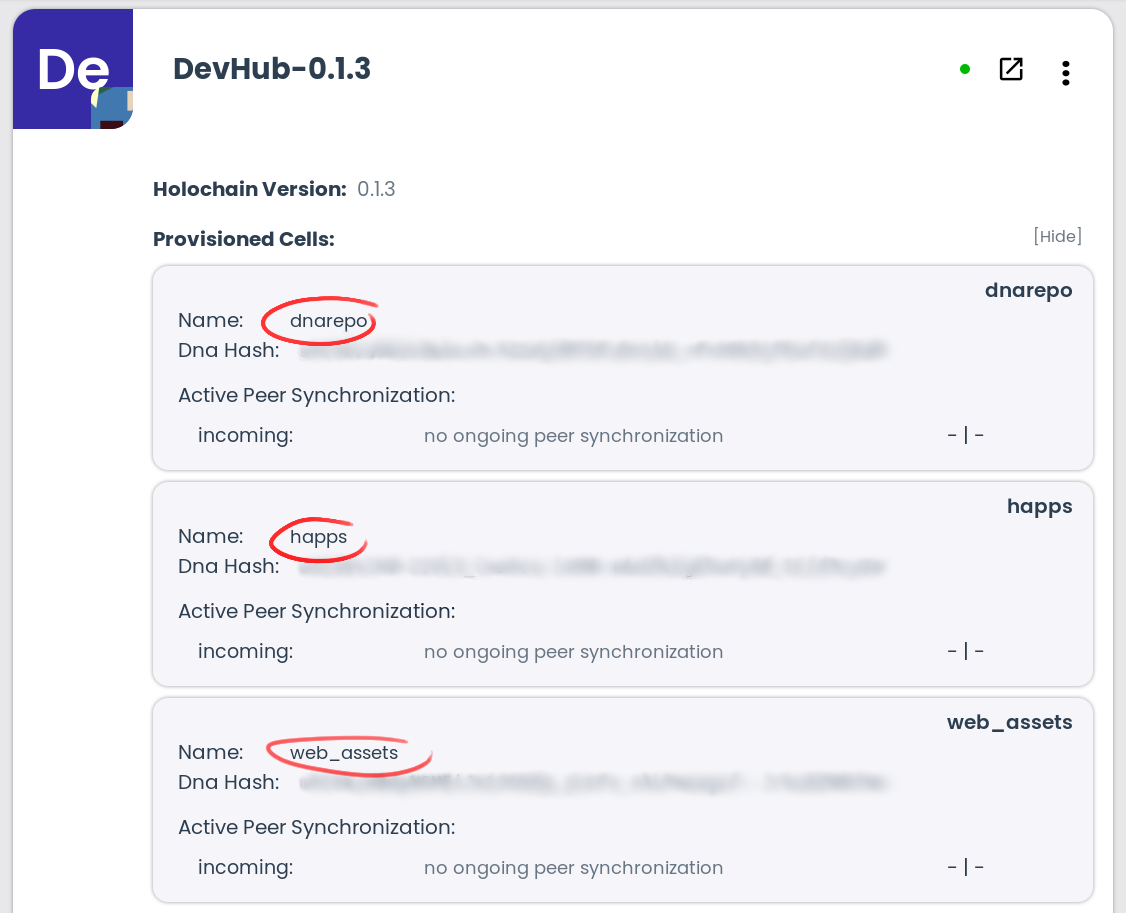
name: gardenswapThis line gives your DNA a name, which will appear in application launchers. The name can contain spaces and other characters and should be written to help a curious application participant understand what it’s doing on their machine. Here’s an example from DevHub, our official hApp package manager hApp:
Next comes the integrity section. Everything in this section affects the DNA hash. Any modifications to this section — either by hand-editing the manifest and rebuilding the DNA, or by specifying new values when you clone a DNA — will cause the DNA hash to change. And when that happens, any cells using that new DNA hash will enjoy their own network, separated from the original.
integrity:
  network_seed: 00000000-0000-0000-0000-000000000000
  properties: null
  origin_time: 2023-03-10T17:42:14.028653Z
  zomes: []
The network_seed value is the easiest way to create a clone; it changes the DNA's hash without affecting its behaviour. Everybody who inputs the same network seed will get the same DNA hash, so they can find each other on their new little network. You can think of it as sort of a network-wide password.
It’d be fiddly for app users to edit this by hand. So you, dear developer, can specify a network seed when your front-end calls the conductor’s CreateCloneCell API endpoint. You can take human input, or you can auto-generate it and find some way of sharing it among people who want to join the clone network.
The properties value is just a spot for you to throw some YAML data into. It’ll get reserialised into MessagePack and then made available to your application code (both zomes via dna_info and clients via AppInfo) for deserialisation. You can use this field to store ‘environment variables’ that change a coordinator or integrity zome’s behaviour — examples are an admin’s public key for permission management, a credit limit for a community currency, or default page sizes for indexing.
The origin_time value is a bit obscure; it defines the ‘birthdate’ of a DNA. This is the earliest allowable timestamp for any actions that people write to their source chains, and it also gets used to make gossip more efficient.
Lastly, zomes is an array of structures that define your integrity zomes. You can’t see anything in the above stubbed file, so here’s an example from the hApp I scaffolded in the last article:
- name: gardenswap_integrity
  hash: ~
  bundled: "../../../target/wasm32-unknown-unknown/release/gardenswap_integrity.wasm"
The name field gives your integrity zome a friendly name within the manifest, so coordinator zomes can refer to it as a dependency.
The hash field is optional, and serves as a sanity check to make sure that the zome being referenced is actually what you expect it to be.
The bundled field looks straightforward — just the path of the compiled WASM file — but it’s just one of three ways of referring to the zome:
bundled: "<path_to_wasm>"will embed the zome’s WASM in the DNA bundle.path: "<path_to_wasm>"doesn’t embed the WASM, and instead expects it to be available at the specified path when the user installs the DNA.url: "<url_to_wasm>"doesn’t embed the WASM either, downloading it from the specified URL at install time.
For both bundled and path I’d recommend relative paths to make life easier for both devs and end-users.
Finally, we find the coordinator section.
coordinator:
  zomes: []
It only has one value, an array of zomes — just as with integrity zomes, these are structures that define your coordinator zomes. These structures have one extra field: dependencies, an array of integrity zomes (referenced by their name fields) upon which this coordinator zome depends. If the DNA has only one integrity zome, this field can be omitted.
What does a ‘dependency’ mean in this case? Simply that this coordinator zome writes and reads entries and links whose types are defined in the listed integrity zomes. Note that, internally, these names are mapped to indices, so you’ll want to specify the dependencies in the manifest in the same order they’re imported into your coordinator zome’s code.
In the manifest file:
- name: "gardenswap_coordinator"
  bundled: "../path/to/compiled.wasm"
  dependencies:
    - name: "profiles" # dependency number 0
    - name: "posts_integrity" # dependency number 1
In your coordinator zome’s lib.rs file:
/ ... other namespaces to be imported ...
use profiles::*; // dependency number 0
use posts_integrity::*; // dependency number 1
// ... rest of file ...
hc dna pack and unpack: bundling and unbundling a DNA file
Once you’ve compiled your zomes and written your DNA manifest, it’s time to pack it up for distribution. hc dna pack dna.yaml does that for you, adding the .dna extension the manifest’s name field for the final filename. If you’d rather specify a name of your own, use the -o argument.
And if you find a DNA that you want to inspect or modify, hc dna unpack <name>.dna will do that for you. Again, you can specify an -o argument; this time it lets you choose a directory to unpack the assets into. If that directory already exists and you don’t care what’s in it, you can use the -f flag to force overwriting.
hApps are meant to be hackable; that’s why every pack command has a corresponding unpack command. In this way a UI developer or skilled user who doesn’t want to get into Rust can take a look at what other people have built and remix it for their context.
hc app: working with hApps
One level broader than a DNA is a hApp. It’s just a bundle of DNAs that comprise the full back-end functionality of an application. You can treat DNAs as microservices, tightly-scoped modules that do one thing and do it well.
hc app init: creating a hApp manifest
The first step, as you may have guessed, is to stub out a hApp manifest file.
[holonix:~/Holochain/gardenswap]$ hc app init happ-workdir/It asks you for a name and a description, then generates the file for you in happ-workdir/. Let’s take a look inside the happ.yaml file.
manifest_version: '1'
name: gardenswap
description: A place for sharing seeds, plants, and extra produce
roles:
- name: sample-role
  provisioning:
    strategy: create
    deferred: false
  dna:
    bundled: ./path/to/my/dnabundle.dna
    modifiers:
      network_seed: null
      properties: null
      origin_time: null
      quantum_time: null
      version: null
      clone_limit: 0
In addition to the familiar manifest version number and name fields, there’s a description field; this lets app launchers show something human-friendly to the person installing it.
After that come the roles of each DNA in the hApp. Each role defines a thing the hApp does, then says “this is the DNA that’s going to fill that role”. You can think of them as similar to interfaces in TypeScript or traits in Rust, albeit without a formal definition of what functionality they’re expected to provide.
Each role has a name:
roles:
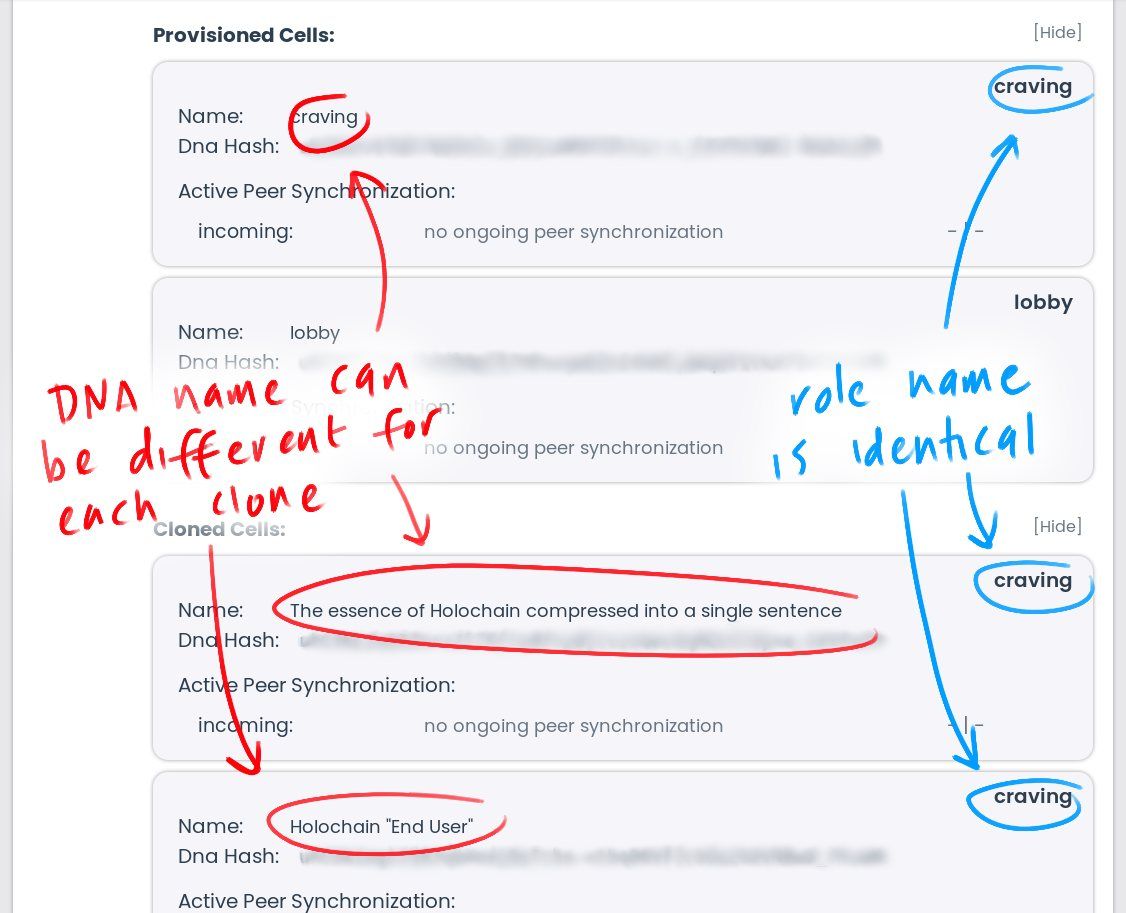
- name: sample-roleThe conductor will use this field both in display and in generating cell IDs — unique identifiers for each cell, or running DNA instance paired with an agent key. Below you can see an example from a hApp that my colleague Matthias created, Word Condenser, which helps people come up with good names for things. The hApp has two roles, lobby (where we come together and find out what things people are trying to name) and craving (where we express a need for a new word). There are three craving cells. Their DNA names, circled in red, are different; but their role name, circled in blue, is identical.
Next we define how the cell is going to be provisioned when someone installs the hApp.
  provisioning:
    strategy: create
    deferred: false
Currently the only supported strategy is create, and the deferred field is ignored. But in the future you’ll be able to specify whether the cell should be created immediately or later, cloned on installation, created only when a cell with the same DNA hash doesn’t already exist, or not provisioned at all and simply made ready for cloning.
After this you specify what DNA is going to fill the role.
  dna:
    bundled: ./path/to/my/dnabundle.dna
    modifiers:
      network_seed: null
      properties: null
      origin_time: null
      quantum_time: null
    version: null
    clone_limit: 0
In addition to the path to the bundled DNA that you created with hc dna pack, along with an opportunity to override the DNA’s default modifiers (except the list of integrity zomes). This lets you reuse other people’s DNAs in your own hApp, creating a new network space via the network seed or other modifiers.
Three fields bear further description:
modifiers.quantum_timelets you tune the way gossiping works for historical data; large numbers are better for DHTs that won’t see much activity. It’s safe to leave this asnull.versionis an optional sanity check that makes sure the DNA you’re pointing to is what you expect it to be. It can be a single DNA hash or multiple DNA hashes in cases where there are multiple compatible versions of a DNA that could work in that role, e.g. while developing the app and experiencing a lot of DNA hash changes. The DNA hash is calculated before this manifest overrides any of its modifiers.clone_limitlets you put a cap on how many clones can be created from this DNA in this role.0prevents clones from being created. Make sure your limit is reasonable — large enough to allow real-world use cases but small enough to limit resource consumption. Every cell takes up a bit more storage, memory, network, and CPU cycles.
hc app pack and unpack: bundling and unbundling a hApp file
Similar to hc dna, once you’ve created your hApp manifest you can bundle it into a hApp file and decompose a hApp file into its manifest and DNA(s). You can also specify DNA manifest files rather than bundled DNA files and give the --recursive flag, which directs the tool to bundle all missing DNAs from their manifests first, then bundle them all into the hApp file. This works by looking for the referenced bundle first, and if it can’t be found, it’ll look for a dna.yaml manifest in the same directory as the missing bundle and bundle it into a file with the expected name.
hc web-app: working with web-based hApps
Once you’ve got your hApp all bundled up, you can bundle it with a web-based client for distribution to the Launcher or the future Holo hosting network. By now, I bet you’ll be able to guess what sub-commands it has — init, pack, and unpack. Let’s try the first one.
hc web-app init: creating a web hApp manifest
Once again, I’m going to put the web hApp manifest file into a work directory. The scaffolding tool puts it into the same workdir/ directory, but as the hc tool currently doesn’t let me do that, I’ll give it its own:
[holonix:~/Holochain/gardenswap]$ hc web-app init webhapp-workdirAgain it asks for a name — and that’s it! Let’s look at the new web-happ.yaml manifest file.
manifest_version: '1'
name: gardenswap
ui:
  bundled: ./path/to/my/ui.zip
happ_manifest:
  bundled: ./path/to/my/happ-bundle.happ
The bundled UI is just a zipped-up web app with, at the very least, an index.html file. You can use whatever front-end framework you like, or just hack away in vanilla JavaScript. The only requirement is that you precompile everything into something a web browser can use. (We’ll get into how to make your UI talk to the hApp in a future article.)
hc web-app pack and unpack: bundling and decomposing a web hApp
These two subcommands operate on a web hApp manifest and .webhapp file in the same way that hc app operates on a hApp manifest and .happ file. Again, hc web-app pack --recursive recursively bundles a missing hApp from a manifest (and likewise any missing DNA bundles specified in the hApp manifest).
hc launch: trialling your hApp locally
When you move from single-instance to distributed computing — whether cloud apps or peer-to-peer apps like Holochain — you gain some things and you lose some things. Scaling problems disappear, but you have to say goodbye to the simplicity of having only one program manipulating only one data store.
Holochain has a number of tools to help you reason about and test your application. There’s a Node.js-based framework for creating automated, multiplayer scenario tests, called Tryorama, but that’s outside the scope of this article (I’ll introduce it in a future one).
For now I’ll introduce a couple subcommands for manually testing your hApps. The simplest one is hc launch, which creates conductor setups for one or more ‘users’ of the hApp and uses a command-line version of the Launcher to show their UIs. The nice thing about this is that you're testing with the same binary as your users will be using. And it live-reloads the UI as you're working on it!
You can launch a hApp simply by entering hc launch <name>.webhapp on the command line. These arguments give you some more control:
--num-sandboxes <number>spawns multiple agents.--network-seed <seed>passes a network seed to all cells.--holochain-path <path>lets you specify an alternative conductor binary on your system, if you’re testing your hApp against different Holochain versions.--ui-path <path>lets you point to a directory full of web assets if you’re launching a UI-less.happfile with a UI of your own.network <mode>lets you specify the transport implementation; you can choose from the defaultquic,mdnsfor local peer discovery, ormemfor single-machine in-memory transport. If you choosequic, you can specify a bootstrap service URL with the-bargument. Note that this is a subcommand, not a standard argument; there’s no preceding--, and it has to come after all arguments, including the name of your.webhappfile.
There are other parameters for more esoteric needs; enter hc launch help to learn more.
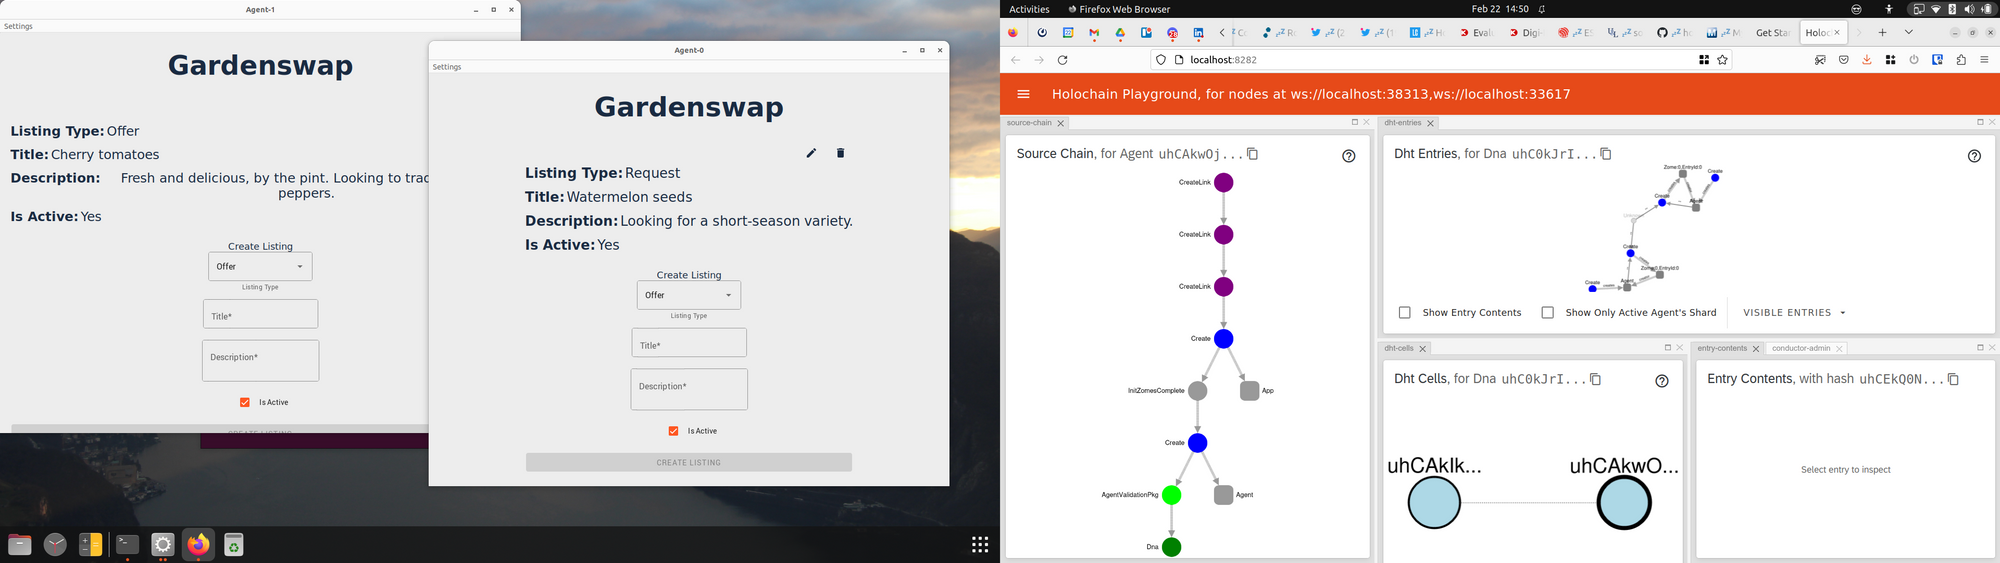
hc launch also spawns a useful tool in your browser: the Holochain Playground. This tool, created by Guillem Cordoba, is sort of a hApp inspector; it gives you a view into the DHT of each DNA in the hApp, as well as the source chains of each locally running cell. It’s great for both learning and debugging.
hc sandbox: creating and running conductor configurations for testing
If you find your needs grow beyond what hc launch can offer, hc sandbox gives you more control over how test instances are created. It generates conductor configurations (sandboxes) that are persisted to disk across test runs, along with the databases that store hApp data. This lets you create test fixtures, although it isn’t recommended to check them into source control because there are some machine-dependent paths and the databases will keep accumulating more data across runs.
Before we get into all the subcommands, some things are common to a number of them:
- The argument
--force-admin-ports <port0>[,<port1>...]specifies WebSocket ports for the sandboxes’ admin APIs. If they aren’t specified, the conductors will each autoselect an unused port. (Note: the admin API lets you control the conductor itself, and is typically used only by hApp launchers, not hApp UIs. You can find documentation on all the endpoints in the JavaScript client library’s documentation or the Rustdoc). - The argument
--holochain-path <path>specifies what conductor binary to use when spawning instances. - By default, sandboxes are created in your system’s temp directory. If you want a consistent place to store them (for example, if you want to check them into source control), the
--root <dir>argument will work for bothhc sandbox createandhc sandbox generate. - As you create or generate sandboxes, the names of the directories in which they’re stored are random, but the full paths to them are stored in an
.hcfile in the directory in which you run the commands.hc runwill find that file and use those paths. If you’re creating sandboxes to be checked into source control, check the.hcfile in as well; otherwise add it to your project’s source control system ignore file.
hc sandbox create: create empty sandboxes for later population
This subcommand simply creates conductor configurations without any hApp configuration in them. This can be useful if you’re building and testing something that controls a conductor — for instance, if you’re developing a hApp launcher or a hApp that embeds both the UI and the conductor in an Electron shell.
In addition to the --root argument and network subcommand I described, hc sandbox create has a couple other arguments:
--num-sandboxes <number>creates multiple sandboxes.--directories <directory0>[,<directory1>...]lets you specify named sandbox directory names rather than the default randomly generated ones. Make sure that you give as many directory names as the number of sandboxes, or it’ll generate random names for the remaining ones!
hc sandbox generate: create hApp sandboxes
This subcommand goes one step further, letting you put a hApp into your generated sandboxes. It takes the path to your bundled hApp, along with --root and network, and the following arguments:
--app-id <id>is just a string to identify the hApp by.--num-sandboxesand--directorieswork like they do forhc sandbox create.--run [<port0>[,<port1>...]]runs the sandboxes right away, with an optional comma-separated list of app interface ports. Make sure the number of ports matches the number of sandboxes, or the remaining sandboxes won’t be run.
hc sandbox run: run those sandboxes you created
Okay, so you’ve generated a bunch of conductor sandboxes, along with hApp, admin API, and network transport configurations, and now you want to run them together and see how they do!
You’ve got a few choices for specifying which sandboxes to run:
--allruns all the conductor sandboxes it finds in your current directory’s.hcfile.--lastruns only the last sandbox listed in.hc.--existing-paths <path0>[,<path1>...]runs only the sandboxes in the specified paths.- A space-separated list of indices as the last argument looks in your
.hcfile and runs only the lines specified. These indices are zero-based.
Finally, you can give a list of app API WebSocket ports with the --ports <port0>[,<port1>...] argument; a 0 for any port will cause the port number to be auto-selected. These port numbers will be saved for the next time you run the sandboxes. See the note above about making sure you specify enough ports for the number of sandboxes you want to run!
The app API, in contrast to the admin API I mentioned earlier, is how your hApp’s client (such as a UI) accesses the hApp itself. You can find more info in the JavaScript client lib documentation or the Rustdoc.
Now your hApp is running a few copies of itself on your machine! The copies are already communicating with each other using the transport protocol you specified when you created the sandbox configs, and they’re listening for clients using the ports you just specified. I’ll explain how to connect your client to those ports and use the app API in a future article on the JavaScript client lib.
hc sandbox call: access a running sandbox’s admin API
Now that you have a bunch of sandboxed conductors running your hApp, you can also call their admin APIs using a command-line interface. All of the admin API endpoints are there as kebab-cased subcommands, and you get to pass API call payloads as command-line arguments and see responses as JSON rather than awkward MessagePack blobs.
A description of these endpoints is beyond the scope of this article, but read the afore-linked documentation and make liberal use of hc sandbox call help <api-endpoint> to learn how to use each of them. And stay tuned for that future article on the JavaScript client lib.
hc sandbox list: list available sandboxes
This one’s a real simple one; it just lists the sandboxes in your current folder’s .hc file alongside their indices for use in hc sandbox run. You can get more info about the sandboxes’ conductor configs with the --verbose argument.
hc sandbox clean: remove sandboxes
This command is even simpler; it deletes the sandboxes whose paths are listed in your current folder’s .hc file and removes the .hc file.
That’s it!
These CLI dev tools are often called ‘Swiss army knives’, and this one is bristling with blades and screwdrivers and other things. It may not be clear yet how to use all of them, but I encourage you to bookmark this article — you’ll likely want to refer back to it as you start digging more deeply into hApp development.